SUBJECT:
ENGINE TICKING NOISE
No: TSB-05-11-002
DATE: July, 2005
MODEL: 2006 Eclipse
CIRCULATE TO: [ ] GENERAL MANAGER [X] PARTS MANAGER [X] TECHNICIAN
[X] SERVICE ADVISOR [X] SERVICE MANAGER [X] WARRANTY PROCESSOR [ ] SALES MANAGER


PURPOSE

Some affected vehicles may have a " ticking" (sounds like a loud valve lifter) noise due to the exhaust rocker arm contacting the intake rocker arm. The noise may occur in the left or the right engine bank, or possibly in both banks. This condition also damages the camshaft.

To eliminate the noise, replace the intake and exhaust rocker arm and shaft assembly and the camshaft in the affected engine bank(s). This bulletin describes replacement procedures.

AFFECTED VEHICLES

2006 Eclipse 3.8L V6 models produced between 6/13/05 - 6/22/05 (between VIN 6E004546 - VIN 6E005929)

NOTE: Dealers should check their inventory vehicles within this VIN range for this condition.

PROCEDURE

Refer to the 2006 Eclipse service manual for details.

1.Start the engine and confirm there is ticking (sounds like a loud valve lifter) noise. If a ticking noise is heard, confirm the location of the noise (left or right engine bank).

2.Record the customer's audio settings.

3.Be sure the windows and the sunroof are completely closed.

4.Remove the strut tower bar.

5.Remove the battery and the battery tray.

6.Drain the coolant and dispose of properly.


PROCEDURE A - RIGHT (REAR) ENGINE BANK:


1.Remove the air cleaner intake.

2.Remove the intake manifold plenum cover.

3.Disconnect the engine harness from the intake manifold plenum. Remove the plenum, and discard the gasket.
NOTE: Place a cloth over the intake manifold to prevent possible damage during repair.

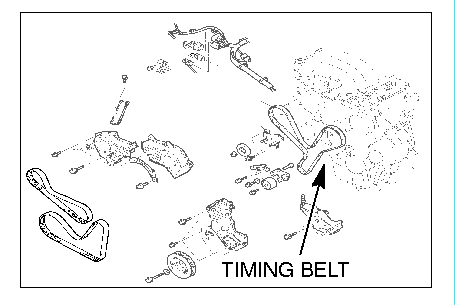
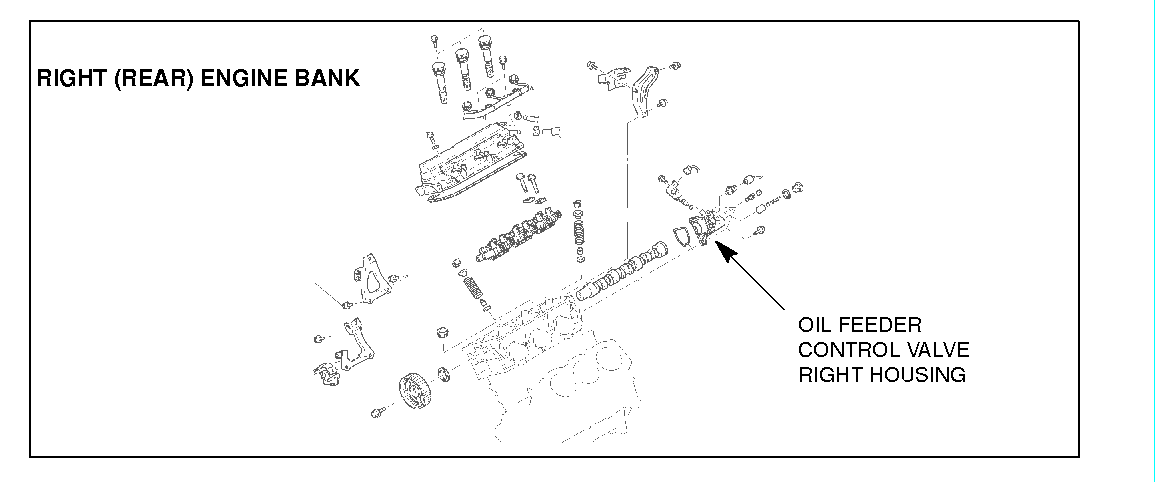
4.Remove the timing belt covers. Refer to page 11C-59 in the 2006 Eclipse service manual.

5.Remove the ignition coils and the rocker cover.

6.Remove the oil feeder control valve right housing.


7.Set the engine timing to TDC No. 1.

8.Remove the timing belt. Refer to page 11C-61 in the 2006 Eclipse service manual.

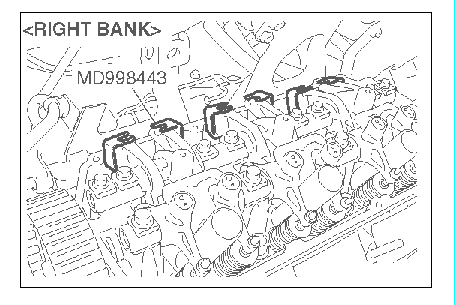
9.Remove the intake and exhaust rocker arm and shaft assemblies. Install special tool MD998443-01 to prevent the valve lash adjusters from falling out.


DO NOT USE IMPACT TOOLS.

10.Remove the camshaft. Install a new camshaft, using the appropriate part listed in the PARTS INFORMATION section of this bulletin.

11.Reinstall the camshaft sprocket. Tighten the camshaft bolt to 88 + 10 Nm (65 + 7 ft/lb).

12.Install new intake and exhaust rocker arm and shaft assemblies. Use the parts listed in the PARTS INFORMATION section of this bulletin. Torque the bolts securing the intake and exhaust rocker arm and shaft assemblies to: Intake 31 + 3 Nm (23 + 2 ft/lb); Exhaust 13 + 1 Nm (115 + 9 in/lb).


DO NOT USE IMPACT TOOLS.
13.Reinstall the oil feeder control valve right housing.

14.Temporarily install the rocker cover. Reinstall the timing belt and reset the engine timing. Refer to page 11C-62 in the 2006 Eclipse service manual.

15.Perform valve clearance adjustment. Refer to page 11C-12 in the 2006 Eclipse service manual.
NOTE: Cold engine specification is 0.10 mm (0.004 in.).

16.Tighten the rocker cover bolts to 3.5 + 0.5 Nm (31 + 4 in/lb.). Do not use impact tools.

17.Reinstall the ignition coils.

18.Reconnect the engine harness.

19.Reinstall the timing belt covers.

20.Reinstall the intake manifold plenum. Use a new gasket, listed in the PARTS INFORMATION section of this bulletin.

21.Reinstall the battery tray and the battery.

22.Reinstall the air cleaner intake.

23.Reinstall the strut tower bar.

24.Add coolant. Refer to page 14-22 in the 2006 Eclipse service manual.
NOTE: Raising the front of the vehicle will help eliminate air in the cooling system more quickly.

25.Use water to clean any spilled coolant from the engine room.

26.Temporarily disconnect the crankshaft position sensor. Crank the engine at least three times to build up oil pressure in the cylinder heads. Then reconnect the crankshaft position sensor.

27.Clear any DTCs set in the PCM.

28.Start the engine and confirm that there are no unusual noises or fluid leaks.

29.Reset the customer's audio settings and reset the clock.

30.Confirm proper window operation. Ensure that the auto down feature on the driver's window, and the short stroke feature on both windows are operational. If necessary, reinitialize the short stroke memory as follows:
a.Close the door.
b.Use the power window switch to fully close the window.
c.Release the power window switch.
d.Pull up the power window switch again and hold it for a few seconds until a soft "click" is heard.

31.Test drive the vehicle to confirm normal engine operation.

PROCEDURE B - LEFT (FRONT) ENGINE BANK:

1.Remove the air cleaner assembly.

2.Remove the battery.

3.Disconnect the engine harness from the front engine bank.

4.Remove the ignition coils and rocker cover.

USE CARE TO PREVENT DAMAGING THE PAINTED SURFACE OF THE ROCKER COVER.
5.Place a large container under the vehicle to collect coolant draining from the cylinder head.

6.Remove the bolts securing the thermostat housing and water pipe housing to the cylinder heads. Reposition the thermostat housing to allow room for camshaft removal.

7.Remove the 10 mm bolt securing the thermostat housing to the coolant pipe at the center of the engine block.


DO NOT PULL THE COOLANT PIPE OUT OF THE WATER PUMP.

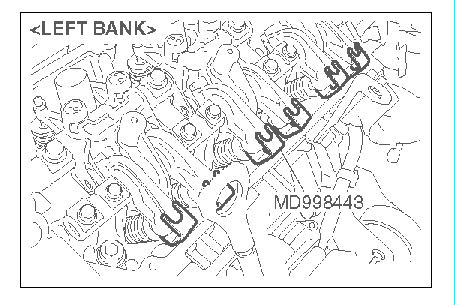
8.Remove the intake and exhaust rocker arm and shaft assemblies. Install special tool MD998443-01 to prevent the valve lash adjusters from falling out.


DO NOT USE IMPACT TOOLS.

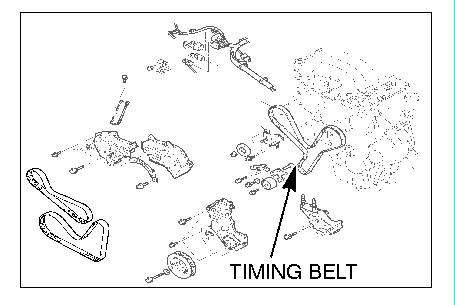
9.Set the engine timing to TDC No. 1.

10.Remove the timing belt.

11.Remove the camshaft sprocket.

12.Have an assistant push down on the radiator hose while pulling up on the water pipe/thermostat housing, to allow room for camshaft removal. Remove the camshaft. Keep the camshaft position sensing cylinder for re-use.

13.Install the camshaft position sensing cylinder to the new camshaft. Install a new camshaft, using the appropriate part listed in the PARTS INFORMATION section of this bulletin.

14.Remove the old sealant from the camshaft position sensor support. Apply new silicone sealant, then reinstall the camshaft position sensor support.

15.Install new intake and exhaust rocker arm and shaft assemblies. Use the parts listed in the PARTS INFORMATION section of this bulletin. Torque the bolts securing the intake and exhaust rocker arm and shaft assemblies to: Intake 31 + 3 Nm (23 + 2 ft/lb); Exhaust 13 + 1 Nm (115 + 9 in/lb).


DO NOT USE IMPACT TOOLS.
16.Reinstall the camshaft sprocket and torque to 88 + 10 Nm (65 + 7 ft/lb).

17.Reinstall the water pipe and thermostat housing. Use the new thermostat housing gaskets listed in the PARTS INFORMATION section of this bulletin, positioned as shown below.

18.Reinstall the timing belt and reset the engine timing. Refer to page 11C-62 in the 2006 Eclipse service manual.

19.Perform valve clearance adjustment. Refer to page 11C-12 in the 2006 Eclipse service manual.
NOTE: Cold engine specification is 0.10 mm (0.004 in.).

20.Reinstall the ignition coils and rocker cover. Tighten rocker cover bolts to 3.5 + 0.5 Nm (31 + 4 in/lb.).


DO NOT USE IMPACT TOOLS.

21.Reconnect the engine harness.

22.Reinstall the timing belt covers.

23.Reinstall the battery.

24.Reinstall the air cleaner assembly.

25.Reinstall the strut tower bar.

26.Add coolant. Refer to page 14-22 in the 2006 Eclipse service manual.
NOTE: Raising the front of the vehicle will help eliminate air in the cooling system more quickly.

27.Use water to clean any spilled coolant from the engine room.

28.Temporarily disconnect the crankshaft position sensor. Crank the engine at least three times to build up oil pressure in the cylinder heads. Then reconnect the crankshaft position sensor.

29.Clear any DTCs set in the PCM.

30.Start the engine and confirm that there are no unusual noises or fluid leaks.

31.Reset the customer's audio settings and reset the clock.

32.Confirm proper window operation. Ensure that the auto down feature on the driver's window, and the short stroke feature on both windows are operational. If necessary, reinitialize the short stroke memory as follows:
DOOR GLASS " SHORT STROKE" INITIALIZATION PROCEDURE
a.Close the door.
b.Use the power window switch to fully close the window.
c.Release the power window switch.
d.Pull up the power window switch again and hold it for a few seconds until a soft "click" is heard.

33.Test drive the vehicle to confirm normal engine operation.

PARTS INFORMATION


Use the Genuine Mitsubishi Parts listed below:

Description Part Number
Exhaust rocker arm and shaft assembly 1030A001RW
Intake rocker arm and shaft assembly MN176022
Camshaft RH 1015A433
Camshaft LH 1015A434
Thermostat housing gasket MD319851
Rocker cover gasket MN137773
Intake plenum gasket 1542A046


WARRANTY INFORMATION

Rocker Arm Assembly and Camshaft Replacement (If Right Bank)
Nature Code: 80D Cause Code: 450
Labor Operation No. 11331094 Time Allowance: 3.7 hrs.
Rocker Arm Assembly and Camshaft Replacement (If Left Bank)
Nature Code: 80D Cause Code: 450
Labor Operation No. 11331095 Time Allowance: 3.4 hrs.
Rocker Arm Assembly and Camshaft Replacement (If Both Banks)
Nature Code: 80D Cause Code: 450
Labor Operation No. 11331096 Time Allowance: 6.3 hrs.
Warranty Coverage: Powertrain Limited Warranty coverage: (10 years/100,000 miles to the original owner and 5 years/60,000 miles to subsequent owners.


Mitsubishi Motors North America, Inc.